How This Site Was Build
By A in Web Development
June 20, 2023
“the world’s fastest framework for building websites”
Introduction
This is my first website build since university. I looked at a lot of options, but Hugo was the best of breed Static Site Generators (SSGs). The use of Hugo also allowed better utilisation of the Cloudflare platform to publish and host the site. There are other options for hosting Hugo sites, but I had a Cloudflare account.
Overall the setup has been a bit of a learning curve to get to this first post, but I will work to document it as best I can.
To start off with the tools used.
- Chocolatey
- Hugo
- Git
- GitHub
- Cloudflare
- Visual Studio Code
- Chrome
- Edge
- OneNote
The Hugo theme used is based on Blogophonic by Formspree see links. A big mention for Tachyons CSS while not as in favour as Tailwind CSS it has still got life. I notice the Washington Post has fork see Washington Post Tachyons The combination of Hugo, the Blogophonic theme and tachyons CSS resulted in very good outcome from Google Chrome Lighthouse at least on localhost.

Google Chrome Lighthouse Mobile Results for points of i on localhost on home page
PowerShell vs Windows PowerShell.
I am using a windows based environment so as per the Hugo.io Quick-Start Guide it recommends to use PowerShell which is different from Windows PowerShell.
The instructions for installing PowerShell are as follows. Microsoft PowerShell Install Instructions
Once PowerShell Terminal installed then you should run all the next steps and commands below from PowerShell.
Chocolatey and Hugo Install.
From PowerShell I used chocolatey to install Hugo I followed this guide to install chocolatey. Chocolatey Install Instructions then follow the Install Chocolatey for Individual Use: instructions.
The next step is to install Hugo which is the following command in Chocolatey
|
|
To test in the PowerShell window, use the following command
|
|
It should return the following.

Hugo Version from PowerShell
Git Install
Before starting with Hugo to build your website. Git needs to be installed locally. For this, I used the installer from Windows Git Installer I took down the windows x64 standalone installer and used default install steps when running the exe. I closed and reopened PowerShell, then ran the following command to confirm that git installed correctly.
|
|
It should return the following.
Git Version from PowerShell
Hugo Site Deployment
With Git and Hugo installed on your PC you can start using either Hugo.io Quick Start Guide or the Deploy a Hugo site · Cloudflare Pages docs Cloudflare Deploy a Hugo Site
In my case, I used a combination of both instructions, as I am using Cloudflare Workers to Publish the site.
As I am using the blogophonic theme it operates a bit different from the standard Hugo themes. Blogophonic is not a theme, it is a full site. It is best to read through the blogophonic instructions to get a better understanding and before beginning usage.
Instead of running the commands in the Hugo or Cloudflare Quick Start guides you will need to run the following commands to setup Blogophonic.
To start with you need to create a directory\folder on a your windows PC. In my case I am using C:\website. Once created you need to use the Website folder from PowerShell.
|
|
Then run (These commands will clone the site)
|
|
Run http://localhost:1313/ from your browser of choice. If the site is successfully cloned, the link will show the site running locally in your browser. From the C:\website\blogophonic-hugo folder created you can make your edits, again follow the instructions on blogophonic instructions.
Markdown, HTML and CSS editor
At this point it is a good idea to install a Markdown, HTML and CSS editor. For this, I chose Visual Studio Code. It can be taken down from Visual Studio Code Download. To install, I used the x64 msi version and the default install setup.
Setup new Git Repository on GitHub
Once you have made your edits to the site, it is time to deploy the site to Cloudflare. To do this, you will need to have an account with github.com then setup a new repository via New GitHub Repository
As the site is a copy, you need to update cloned repository using the following commands to update the repository to point to your new GitHub repository.
Push git cloned repository to your own on GitHub
These commands should be run in PowerShell and in the C:\website\blogophonic-hugo folder that was created when the site was cloned.
|
|
Result: it is pointing to the incorrect repository.
Repository Version from Clone
|
|
Result: it is pointing to no repository.
Repository from Clone has been removed
|
|
Result: is you should now see your repository name for the repository.
Pushing Site to Github.
At this point you can sync the local site to the github.com repository. These are they instructions from Cloudflare create a GitHub repository
|
|
Then, check your repository on github.com. It should contain all the items in C:\website\blogophonic-hugo apart from the public and resources folders. If it has not synced, then try the following.
|
|
The first command is adding all files in your directory, in this case C:\website\blogophonic-hugo. The next command is a Git commit. The commit message is mandatory.
Deploying Hugo Site with Cloudflare from Github repository.
Once you have successfully synced your local git repository to the github.com we are ready to deploy the site to Cloudflare. For this we will be again mostly following the directions from deploy Hugo with Cloudflare pages
Log in to the Cloudflare dashboard and select your account.
In Account Home, select Workers & Pages > Create application > Pages > Connect to Git. You will be prompted to login in to github.com. Once logged in you will see the repository that you have created and synced.
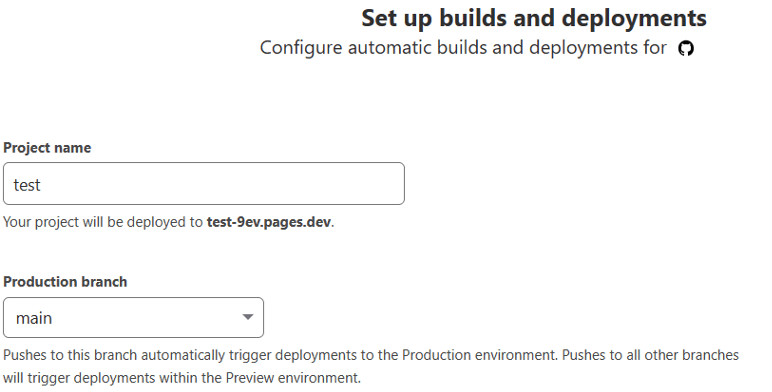
Select the new GitHub repository that you created and in the Set up builds and deployments section, provide the following information:
Project: Should be the repository name.
Production Branch: should be main (as your git commands above)

Cloudflare Project and Production Branch information
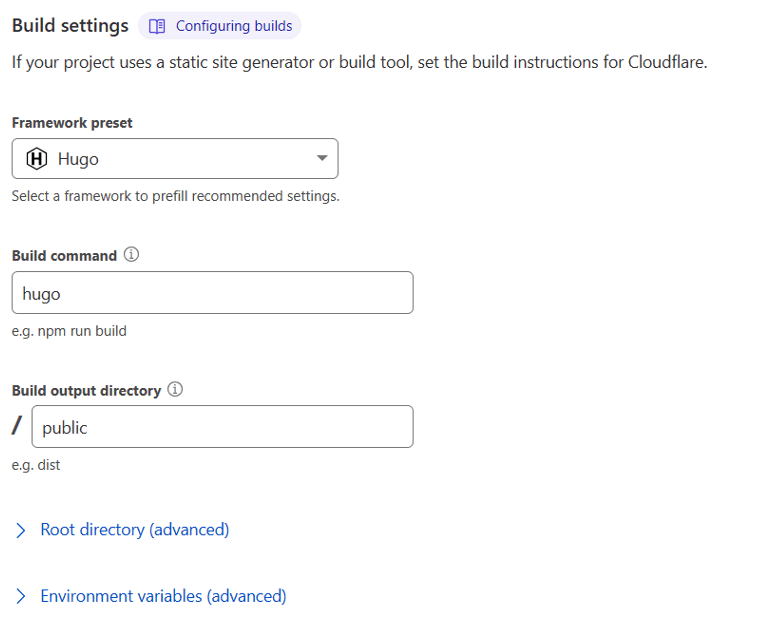
The next section is Build settings.
If you select your framework pre-set as Hugo. Cloudflare will fill out the details.
Build command: Hugo
Build output directory: public

Cloudflare Framework and Output directory information.
Once these settings are completed then hit the Save and Deploy button. This will sync the repository from your github.com account and then build it using Hugo command and deploy to Cloudflare
If the Cloudflare deployment is successful you will get a https://*.pages.dev. The * being a uniquely generated link for that deployment e.g. https://ccbb28.pages.dev/ (this is just an example the link does not work).
If you have got to this point your site is deployed to Cloudflare. Any git commits that you now make locally and push to github.com (if there are no bugs) it will get published to the site automatically.
Cloudflare Custom Domains
Because https://www.pointsofi.com is using Cloudflare as the Domain Registrar and DNS. I can point the deployed site to the Hugo Site deployed on Cloudflare to https://www.pointsofi.com
To do this we need to follow these instructions based on the link Cloudflare Custom Domains.
That is it.
- Posted on:
- June 20, 2023
- Length:
- 6 minute read, 1258 words
- Categories:
- Web Development
- Series:
- Getting Started
- Tags:
- hugo-site
- See Also:
